
Vegan Fairy Cakes
Enchanting Vegan Fairy Cakes: A Light & Fluffy Recipe
Prepare to be delighted by these delicate, fluffy, and absolutely charming Vegan Fairy Cakes. Perfect for any occasion, these little treats are impossibly light in texture and bursting with customizable flavors. Whether you’re planning a tea party, packing a school lunch, or simply craving a sweet, plant-based indulgence, this recipe will guide you to create a magical treat that’s uniquely yours.
Ingredients & Equipment
Gather these simple ingredients and tools to begin your baking adventure.
For the Fairy Cakes
- 100 g dairy-free margarine, at room temperature
- 150 g caster sugar
- 100 g plain dairy-free yogurt
- 100 ml unsweetened dairy-free milk (like almond or soy)
- 1 tsp vanilla extract
- 150 g self-raising flour
- 1 tsp bicarbonate of soda
For the Simple Glacé Icing
- 100 g icing sugar, sifted
- 4–5 tsp water
- Vegan-friendly edible sprinkles, for decorating
Essential Equipment
- Oven
- 12-hole muffin or cake tray with paper liners
- Food blender or electric mixer
- Small mixing bowl
- Large mixing bowl
- Wooden skewer or sharp knife
- Spoon
- Airtight container
How to Make Vegan Fairy Cakes: Step-by-Step
1. Prepare the Batter
- Preheat and Prep: Begin by preheating your oven to 170°C (325°F). Line a 12-hole cake tray with paper wrappers to prevent sticking.
- Cream Margarine and Sugar: In a food blender or a large bowl with an electric mixer, cream the dairy-free margarine and caster sugar together until the mixture is light, pale, and fluffy. This should take about 4–5 minutes.
- Combine Wet Ingredients: In a separate small bowl, whisk together the dairy-free milk, dairy-free yogurt, and vanilla extract until smooth.
- Mix Dry and Wet: Add the self-raising flour and bicarbonate of soda to the creamed margarine mixture. Gently begin to mix, then gradually pour in the wet ingredients. Mix only until a smooth batter forms—be careful not to overmix, as this can make the cakes tough.
- Fill the Liners: Carefully and evenly distribute the batter among the 12 cake liners. Give the tray a gentle tap on your work surface to release any trapped air bubbles.
2. Bake to Perfection
- Bake the Cakes: Place the tray in the preheated oven and bake for 14–17 minutes. You’ll know they’re ready when they are golden and a wooden skewer or knife inserted into the center of a cake comes out clean.
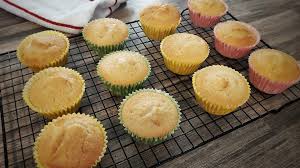
- Cool Completely: Allow the fairy cakes to cool in the tray for a few minutes before transferring them to a wire rack to cool completely. For the best icing results, let them rest overnight in an airtight container before decorating.
3. Decorate Your Masterpieces
- Make the Icing: In a small bowl, mix the sifted icing sugar with the water, one teaspoon at a time, until you have a thick but spreadable paste.
- Decorate: Spoon a small amount of the glacé icing onto the top of each cooled fairy cake, letting it drizzle down the sides slightly. Immediately add your vegan-friendly sprinkles before the icing sets.
Get Creative: Unique Topping Ideas
While simple sprinkles are classic, why not try one of these fantastic flavor combinations?
- Lemon Zing: Top with a dollop of vegan lemon curd made with fresh lemon juice and maple syrup.
- Raspberry Rhapsody: Spread a thin layer of vegan-friendly raspberry jam for a sweet and fruity finish.
- Pistachio & Cardamom: Garnish with a swirl of cardamom-spiced buttercream and a sprinkle of crushed pistachios.
- Orange Blossom: Instead of water, use fresh orange juice in your icing and top with a little orange zest.
- Nutty Crunch: Sprinkle with finely chopped almonds, pecans, or hazelnuts for wonderful texture.
Expert Tips for Baking Success
- Use Room Temperature Ingredients: Ensure your margarine, yogurt, and milk are at room temperature. This helps them combine seamlessly for a perfectly smooth batter.
- Choose the Right Flour: High-quality self-raising flour gives the best lift. For a gluten-free version, use a trusted GF self-raising blend.
- Don’t Overmix: Gently fold your ingredients together until just combined. Overmixing develops the gluten and results in dense, heavy cakes instead of light, airy ones.
- Try Sugar Alternatives: For a different flavor profile, experiment with coconut sugar or date sugar. Note that this may change the color and texture slightly.
Serving & Storage Solutions
Serving Suggestions
These fairy cakes are a perfect afternoon treat. Pair them with herbal teas like rosehip, peppermint, or chamomile. They are also wonderful alongside a hot cup of vegan coffee or a foamy plant-based latte. For a fresh touch, serve with a side of sliced berries.
Storage Information
Store your decorated fairy cakes in an airtight container at room temperature for up to 3 days, or in the fridge for up to a week. They also freeze beautifully, making them ideal for meal prep or future lunchbox treats. Just freeze them undecorated and add the icing after they’ve thawed.
Nutritional Information
The following values are an estimate for one serving.
- Serving Size: 1 fairy cake
- Yields: 12 servings
- Calories: 195 kcal
- Carbohydrates: 31 g
- Protein: 2 g
- Fat: 7 g
- Sugar: 21 g
- Fiber: 1 g
- Sodium: 179 mg
- Iron: 1 mg